The Email Notification page lets you specify the email address(es) to which you want notifications sent, as well as the types of notifications you want to receive.
Setting up email notifications is a multi-step process:
Specify the email address(es) to which email notifications should be sent.
Select the health status at which you want to be notified for online monitored machines and for those from which data is collected with a TRIO data collector.
Specify whether you want to be notified when a new report is posted to the Portal and, if so, whether you want it attached to the email.
Set up collection and reporting reminder emails to help manage your PdM program.
Identify the plants for which you want to receive notifications.
Click the Save button at the bottom of the page to commit your selections.
Each section of the Email Notifications page is described below.
Email notifications are tied to your user login and are sent to the email address(es) you specify.
In most cases, you will set up your own email notifications. However, DBManagers, Analysts, and Administrators can set up notifications for other users.
Important! Only enter email addresses related to the user whose notifications you are setting up. You can always tell whose notifications you are working on because the top of the page will say "Email Notifications of....
To specify where email notifications are sent:
From the top navigation bar choose Preferences>User.
Do one of the following, depending on whether you want to specify email notifications for your own login or for someone else's.
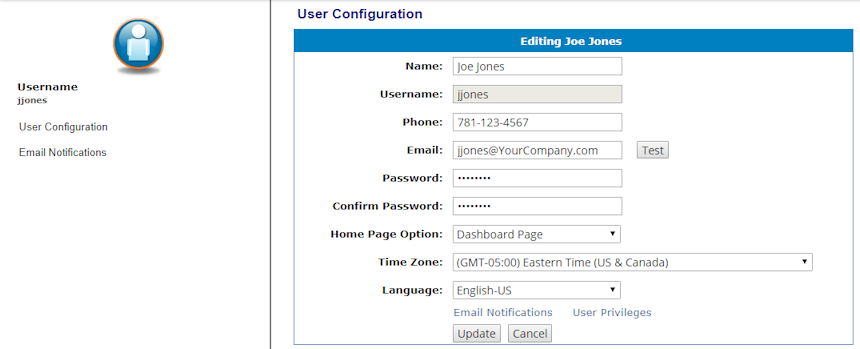
To set up email notification for yourself, click the Email Notification link on the left side of the page. This ALWAYS opens the Email Notifications of the currently logged in user, regardless of whose information is being configured in the main (right) section.

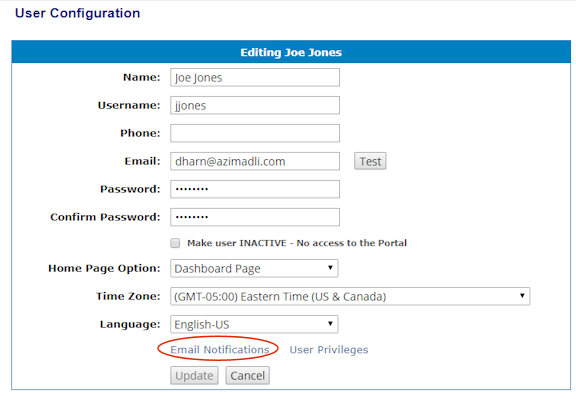
If you are a DBManager, Analyst, or Administrator, you can set up email notifications for a user other than yourself. Locate the user from the list of logins, click the Edit User button, and then click the Email Notifications link at the bottom of the User Configuration page. (This link does not appear for general "Users." Users can only access their email notifications via the link to the right, as explained above.)
At the top of the Email Notifications page, enter the email to which you want notifications sent.
In the Description box, enter a description of the contact (for example, office).
In the Email box, enter the address associated with this contact (for example, your corporate email address).
Select the Active check box at the beginning of the row to turn on email notifications for this contact. If you do not select this check box, this contact will not receive email notifications.
Select either the Text or HTML option button to specify how you want the emails formatted when they are sent. (Most users select HTML.)
Click Add. The information you just entered creates a new row below the boxes.
Repeat Steps 3-4 for each email address to which you want notifications sent -- for example, your corporate and personal email addresses. DO NOT enter email addresses for other users. If you are setting up notifications for a user other than yourself, be sure to only enter emails for that user.

Tip! To delete a contact, click the Delete button next to it. This button appears when a contact has been added. You can also edit an existing contact (for example, to change an email address or to make it inactive) by clicking the Edit button.
Specify the Machine Health Status Notifications, Report Notifications, and Reminders you want. All of the available options are explained below.
Click Save at the very bottom of the page to save what you specified.
Tip! If you want to specify that this user only have access to certain plants and/or areas, click the User Privileges of <user name> button at the bottom of the page to jump to that user's privileges.
Once you have added at least one email address and deemed it "active," you can specify the machine health status notifications that you want to receive.

This section only appears if your program includes machines that are monitored online by the WATCHMAN Online System. These machines have data collected automatically via a SPRITE data acquisition device and not with a TRIO portable vibration data collector.
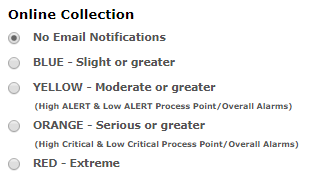
Select an option button to specify the health status level at which you want to be notified. For example, if you select the ORANGE - Serious or greater option button, you will receive an email notification whenever a machine status changes to Orange - Serious or worse (Red - Extreme). You also have the option of selecting No Email Notifications so that you do not receive any status change emails.
These notifications are based on when the WATCHMAN Online System posts updated health information to its master database at the WATCHMAN Data Center. The timing of these updates vary by the needs of each customer. For example, some facilities may post updated machine health once per day on a schedule and anytime the system detects a machine health status change that remains steady for more than a specified set of time.
How your WATCHMAN Online System program is configured usually depends on the number of machines in the program and their criticality to production. Keep in mind that Portal email notifications are tied directly to these configuration settings. For example, if your WATCHMAN Online System only posts updated health statuses once per day and a machine state changes after that day's posting, you will not receive notification of the change until the next day.
Online collection notifications are also triggered by process point and overall alarm set in the database.
For machines from which data is collected with a TRIO data collector, select an option button to specify the health status level at which you want to be notified.
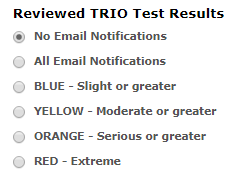
For example, if you select the ORANGE - Serious or greater option button, you will receive an email notification whenever a machine status changes to Orange - Serious or worse (Red - Extreme). You also have the option of selecting No Email Notifications so that you do not receive any status change emails.
Important! The Reviewed TRIO Test Results notification is ALWAYS based on Analyst Reviewed Results. If you have any online machines, the selection you make here will also apply, but only when there is an Analyst Reviewed Result for a machine.
This email can include links to an Asset Health Viewer for each machine so you can see detailed machine health information without logging in to the Portal. This feature must be turned on for your database.
Use the Report settings to specify whether you want to be notified when a new report is posted to the WATCHMAN Reliability Portal and, if so, whether you want it to be attached to the email notification.

Select the Analyst Report check box to receive emails when a new report is posted.
Select the Attach Report check box to have the report attached to the email notification.
Reports are posted to the Portal in two ways -- from the Portal and from ExpertALERT-Cloud.
Any user can post a report directly from the Portal. However, only those with an ExpertALERT-Cloud subscription can post reports directly from the diagnostic software at the WATCHMAN Data Center.
If you select the Analyst Report check box, you will receive a notification regardless of how a report is posted, as long as your login has permission to the plant/area about which the report is about and you have not excluded the plant/area from receiving email notifications.
Note: When someone posts a report to the Portal, they decide whether the system sends an email notification about it. If they opt to send an email, you will only receive it if the Analyst Report check box is selected via your Email Notifications.
The Reminder section lets you specify the reporting and collection activities about which you want to be notified.
For most customers, reminder notifications are applied on the plant level. (The Apply Reminders to setting is configured in advance by Azima and cannot be changed via the Email Notification page by any user, even Administrators. If you believe it should be at a different level, contact Azima.)
If your Apply Reminders to setting is set to Plants, it means reminder notifications will cover an entire plant-- including all areas within it. Reminders are only sent for the plants you specify (explained below).
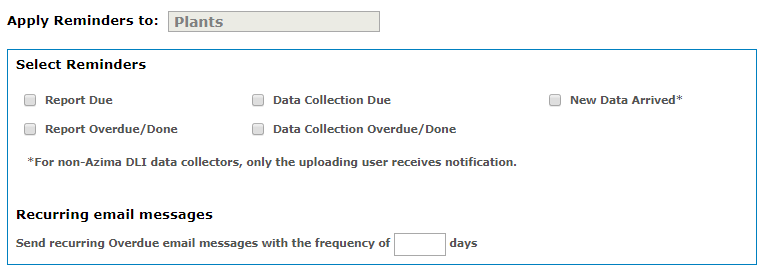
Select the check boxes of the events for which you want to receive an email notification:
Report Due. This email reminder is sent when a specific percentage of machines has had data collected within the specified collection period. The percentage that triggers this notification is set in advance by Azima at the WATCHMAN Data Center. For example, a Report Due email may be sent when 80% of the machines in the plant had data collected. Note that if this percentage is not hit prior to the end of the collection period, a Report Due email is not sent.
Report Overdue/Done. Once a Report Due email is sent, the analyst has a specific number of days to review the data and post a report. (This time span is based on the customer's contract and specified in advance by Azima at the WATCHMAN Data Center.) If a report is not posted by the deadline, a Report Overdue reminder email is sent the day after the due date. A Report Done email is only sent if a Report Overdue was sent -- the Report Done email lets you know that the report has been posted.
Important! If a report is posted within the allotted time frame (that is, you never receive a Report Overdue notification), you will only receive notification of the new report if you have set up new report notifications.
Data Collection Due. This reminder is sent when a specific percentage of machines has not had data collected within the collection period. The percentage that triggers this reminder is set in advance by Azima at the WATCHMAN Data Center.
Data Collection Overdue/Done. If the specified percentage of machines has not had data collected by the end of the collection period, a Data Collection Overdue reminder email is sent one day after the collection period. A Data Collection Done email is only sent if a Data Collection Overdue reminder was sent -- the Data Collection Done email lets you know when the specified percentage of machines has had data collected.
Tip! Data must be synchronized to the WATCHMAN Data Center in order for the Portal to know that collection is complete. If data is collected, but not synchronized (replicated), the Portal considers the data NOT collected since the new data is not in the database at the WATCHMAN Data Center.
If you want email notifications sent on a recurring basis for overdue events, enter a number of days in the Send recurring Overdue email messages... box to have subsequent overdue notices sent.
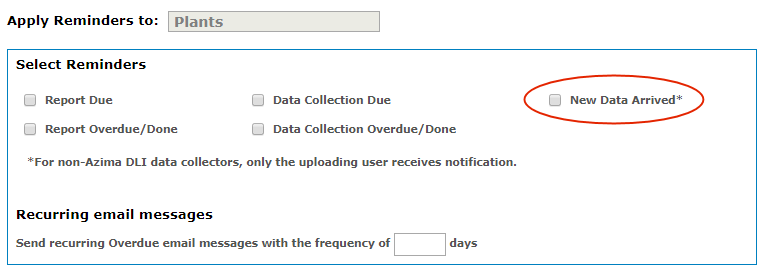
This reminder is sent when new data is inserted into the ExpertALERT database at the WATCHMAN Data Center.
To receive this type of notification, select the New Data Arrived check box.
Note: A New Data Arrived notification only triggers a Report Due notification if the received data brings the total percentage of machines from which data has been collected to the value specified by Azima at the WATCHMAN Data Center.
The very bottom of the Email Notification page is where you specify the plants for which you want to receive notifications. Only plants to which your login has permission are listed. (If your Apply Reminders to option is set to Area, you will see a list of areas instead of plants.)
Select the All Plants option button to receive notifications for all of the plants. If you select this option button, the list of plants disappears.
If you only want notifications for certain plants, select the Select Plants option button and then select the check boxes for the plants you want.
Tip! if your program includes a lot of plants, you can use the Select/Unsettle All check box to toggle on or off all of the pant check boxes to make selection easier.
